
Would you like an alternative connect workflow using Stripe Connect Express?
This article is going to provide you with a quick step by step guide to set up the payment processing for Stripe Connect Express. Below are the steps to use Stripe Connect Express with Atlas.
- Step 1. Create your Stripe Connect account.
- Step 2. Enable the toggles and add the Stripe keys.
- Step 3. Create campaigns and use Stripe Connect Express.
Step 1. Create your Stripe Connect account.
Log into Stripe or create a new account by going to Stripe.com and click on the link in the top right corner to either sign in, create new account, or go to your dashboard. Be sure to sign up for a Stripe account and follow the steps to create a Stripe connect account. To create the connect account, you will need to be signed into the Stripe dashboard and click on the connect tab in the left menu and follow the steps. Be sure to add the appropriate information to ensure that Stripe will approve your account.
Step 2. Enable the toggles and add the Stripe keys.
Once you have signed up for a Stripe connect account, you will need to make sure that you have enabled the correct toggles in both the Stripe dashboard, and the admin dashboard on Atlas.
First, log in as an admin in your Thrinacia website. Go to the admin dashboard –> Portal Settings –> Payment Settings, and make sure you have enabled the following toggles.

Once you have enabled the toggles, you can go into your Stripe account and copy/paste the following keys from Stripe into your payment settings.
- First, grab the publishable key and secret key from Stripe. To do this, log into Stripe, then click on the Developers text at the top of the page (on the right side), then click on the API keys suboption.
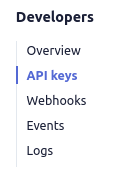
Stripe API Keys - In the API keys page, you will see 2 API keys that you need to copy and paste into their respective fields on the payments settings page.

Copy the Publishable key and the Secret key into the payment settings - Next, click on the Settings icon at the top right corner of the page, then click on the Connect settings on the page.

Click on the gear icon for settings 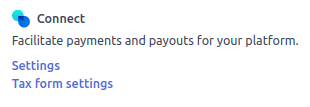
Connect Settings - Once you are in the connect settings page, you will need to copy the Client ID and paste it into the proper field on the Atlas platform.

Copy & Paste Client ID - Next, you will need to enable the correct OAuth settings. Toggle the OAuth for Express account ON. Do not toggleOAuth for Standard accounts.

Enable the Express toggle - Once you have done this, you will need to copy the Redirect URL from the payment settings on Atlas.

Copy redirect URL You will then need to go back to the Stripe dashboard and click on the Redirect URI button to add your redirect URL.

Add the redirect URL - You can then enable/disable and add the settings to your preference on the payment settings page on the Atlas platform. These settings may include the country and the currencies you would like to be using on the platform.
Step 3. Create campaigns and use Stripe Connect Express.
Now that the correct payment settings are configured, you can test the workflow by creating test campaigns. When you arrive at the funding step during campaign creation, you will see that the process looks as follows when you click on the Stripe button:


The above example is using test mode, but the same onboarding flow will apply.
If you have any questions or concerns, you can contact us or visit our Discord chat to speak with us in real time.