Would you like to add a portfolio component to your crowdfunding website? This tutorial will cover an easy way to add a customizable portfolio feature to your Atlas website in 3 simple steps.
We will be using the component provided by Skhemata, a partner of Thrinacia. Skhemata makes it easy to add components to any website and provides extensive functionality that can be customized via HTML attributes, CSS, and more. So let’s get started.
Step 1. Thrinacia Subscription
Since Thrinacia is partnered with Skhemata, you can gain access to the components by subscribing to the correct plan as outlined in this FAQ here.
Step 2. Modify the widget code
The Skhemata components can be used in different ways. For this tutorial, we are going to be using the components via widget code. The actual source code is hosted on the Skhemata CDN so you will be able to easily copy and paste a small snippet of widget code to reference it.
To see what this component will look like, here is an example of the portfolio component. You can see this is the Skhemata documentation for the components, you can also see that there’s a tab for the widget code. This is not going to be the same as the widget code that needs to be pasted into the Atlas platform. Please use the code provided below as it needs to be pasted into a WYSIWYG editor. Such editors can have limitations so the widget code needs to be tailored for this.
Here is an example of the widget code:
<div class="ui page grid">
	<div class="column">
		<skhemata-portfolio config-src="your-url-here"></skhemata-portfolio>
		<script>
			async function check()
			{
				const script = await
				import ('https://cdn.jsdelivr.net/npm/@skhemata/skhemata-portfolio@latest/build/index.js');
			}

			check();

		</script>
	</div>
</div>
You can copy and paste the above code into a page on your platform. If you do this, you will notice that there’s nothing on the page. This is because you need to add the content to the portfolio. To do this, please copy/paste the below code onto a blank page, and host is somewhere, for example github:
[
    {
        "title": "Project One",
        "imageUrl": "https://picsum.photos/600/800",
        "siteLink": "https://www.devradius.com",
        "projectDescription": "Lorem ipsum dolor sit amet, consectetur adipiscing elit, sed do eiusmod tempor incididunt ut labore et dolore magna aliqua. Ut enim ad minim veniam",
        "siteName": "my new site"
    },
    {
        "title": "Project Two",
        "imageUrl": "https://picsum.photos/600/800",
        "siteLink": "https://www.devradius.com",
        "projectDescription": "Lorem ipsum dolor sit amet, consectetur adipiscing elit, sed do eiusmod tempor incididunt ut labore et dolore magna aliqua. Ut enim ad minim veniam"
    },
    {
        "title": "Project Three",
        "imageUrl": "https://picsum.photos/600/800",
        "siteLink": "https://www.devradius.com",
        "projectDescription": "Lorem ipsum dolor sit amet, consectetur adipiscing elit, sed do eiusmod tempor incididunt ut labore et dolore magna aliqua. Ut enim ad minim veniam"
    },
    {
        "title": "Project Four",
        "imageUrl": "https://picsum.photos/600/800",
        "siteLink": "https://www.devradius.com",
        "projectDescription": "Lorem ipsum dolor sit amet, consectetur adipiscing elit, sed do eiusmod tempor incididunt ut labore et dolore magna aliqua. Ut enim ad minim veniam"
    },
    {
        "title": "Project Five",
        "imageUrl": "https://picsum.photos/600/800",
        "siteLink": "https://www.devradius.com",
        "projectDescription": "Lorem ipsum dolor sit amet, consectetur adipiscing elit, sed do eiusmod tempor incididunt ut labore et dolore magna aliqua. Ut enim ad minim veniam",
        "siteName": "my new site"
    },
    {
        "title": "Project Six",
        "imageUrl": "https://picsum.photos/600/800",
        "siteLink": "https://www.devradius.com",
        "projectDescription": "Lorem ipsum dolor sit amet, consectetur adipiscing elit, sed do eiusmod tempor incididunt ut labore et dolore magna aliqua. Ut enim ad minim veniam"
    }
]
You’ll notice that there’s specific content that’s broken into several sections. Each section is going to be a single project and the content in those areas will display when you hover over the specific project.
Once you have added your custom content, you will need to save it as a JSON file and host it somewhere in order to reference it in the widget code.
You can see in the widget code that there’s an area which says your-url-here. You will need to replace that with the URL of your JSON file. It will grab that data and add it to the portfolio component.
Step 3. Paste the widget code
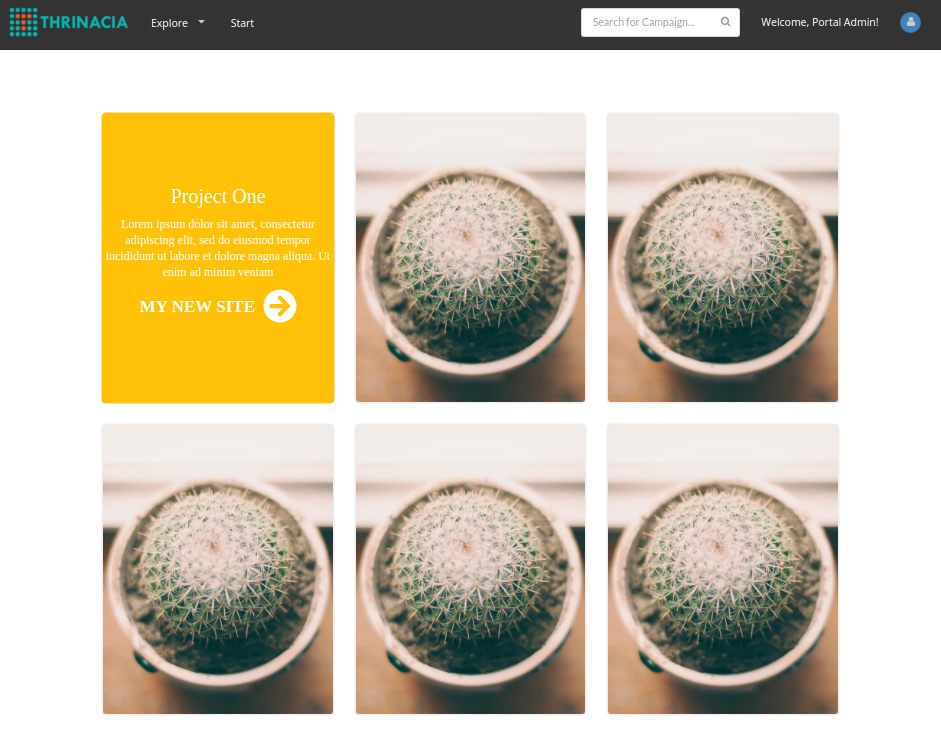
Once you have replaced the URL and saved the page with the widget code, you should be able to see something like this:
Check out the Skhemata documentation for more information about customizing using HTML attributes and CSS properties.
For further manipulation and customization, you will need to do so via custom code. Remember, the widget’s source code is hosted on the Skhemata CDN, so you will not have access to manipulate this in particular, but you can add your own custom CSS, javascript, and use the provided attributes.
For any questions regarding the components or customization, contact Thrinacia or join Thrinacia’s Discord chat.