
Are you looking for some help with creation of your Stripe account for your Atlas powered Crowdfunding website? If so, you may be wondering what Stripe does, and how to create an account to start accepting contributions.
This article is going to explain how to create an account so that you can connect it to the platform, and accept contributions/donations.
Please note that we are not Stripe, and unfortunately cannot help with creating a Stripe account for you, or answer questions / solve issues that are related to Stripe’s product and services. We are only partners with Stripe, if you have any issues with Stripe’s product, this is something that you will have to consult with Stripe’s support.
Stripe is a payment processor that is used on the Atlas platform, and other Thrinacia products. Thrinacia is a partner with Stripe and exclusively uses Stripe to process the payments on the platform. It is one of the most used payment processors available and is very secure.
Follow the steps below to create a Stripe account for your Atlas Crowdfunding experience:
Step 1. Go to Stripe and register
To begin, you will have to go to Stripe’s website here.
You can click on the green “Sign In” button to start creating a new Stripe account. Then click on the signup text at the bottom of the login page. You will then be direct to the following page:

Enter the necessary information. Once you are done, you will be directed to the next page, and receive the confirmation email.
Step 2. Access the Stripe dashboard
Once you have filled out the “Create your Stripe account now” form, as shown in the image above, you may be directed to the following.

If you are, choose “Skip for now” option at the bottom of the page. You do not need any Solutions for developers, or Pre-build solutions.
If you do not see the image above, do not worry, this is fine.
Once you choose this option, you will be directed to the Stripe dashboard.

Also, remember to check your email so that you can confirm your account.

Now that you have found your way to the Stripe administrator dashboard, you can choose to go live or remain in test mode. As you may or may not be aware, there are two modes which include live mode and test mode. By default, you will be in test mode.
Note you should also create, and name the new account. You can do this by clicking on the “Add a name” button in the top left corner of the page and add a new account and name.


This can be done if you want to create and connect a new Stripe account as well.
Step 3. Start accepting payments
You can test the platform, and make test payments while in test mode, however, if you would like to start accepting real money, you would have to be using live mode.
To go into live mode, hover over the following toggle in the left menu:

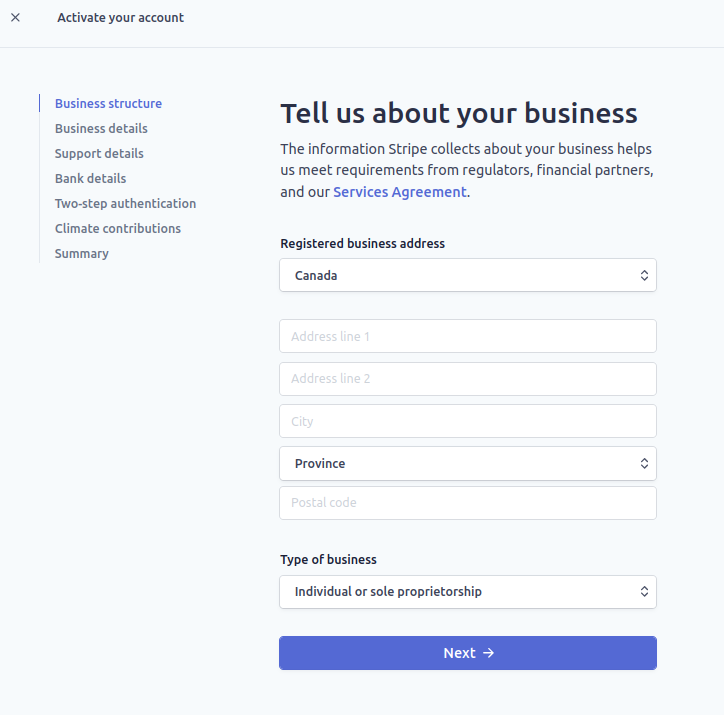
Click on “activate your account”. You will then be directed to a form that has all of the details needed so that you can accept real money into your bank account.
Once you are finished, you can submit your application to start accepting real money.
Please note: for those that want the campaign creators to connect the Stripe account to the campaign, it is recommended to read the following FAQ for a quick lesson on the individual signup process: https://www.thrinacia.com/faq/post/can-campaign-creators-connect-their-stripe-account-as-a-business-or-individual
If you are experiencing any issues, you can contact Stripe support. If you have any questions about connecting your Stripe account to your Atlas platform, you can contact Thrinacia. Learn more by watching the following video: